
Lockdown angles, control chokepoints, and clear bombsites to improve your score per minute on Checkmate.
This secluded facility was once a Perseus training course designed for Soviet Espionage. Now, it’s one of the many Black Ops Cold War 2v2 Search and Destroy Open Series maps. Unlike Garrison, Moscow, or Crossroads Strike, Checkmate mixes tight spaces with many long, wide-open lines of sight. Let’s dismantle the opposition!
Offensive Checkmate SND routes
Checkmate has more unique rush routes than most of the maps. A large number of pathways make it an aggressive player’s paradise.
You should almost always stay with your teammate to reduce collateral damage throughout the Call of Duty Open Series. Checkmate is the exception. Splitting up is optimal because multiple lines of sight intersect at every turn. Bait enemies with equipment or even stray shots for flanks and bomb plants.
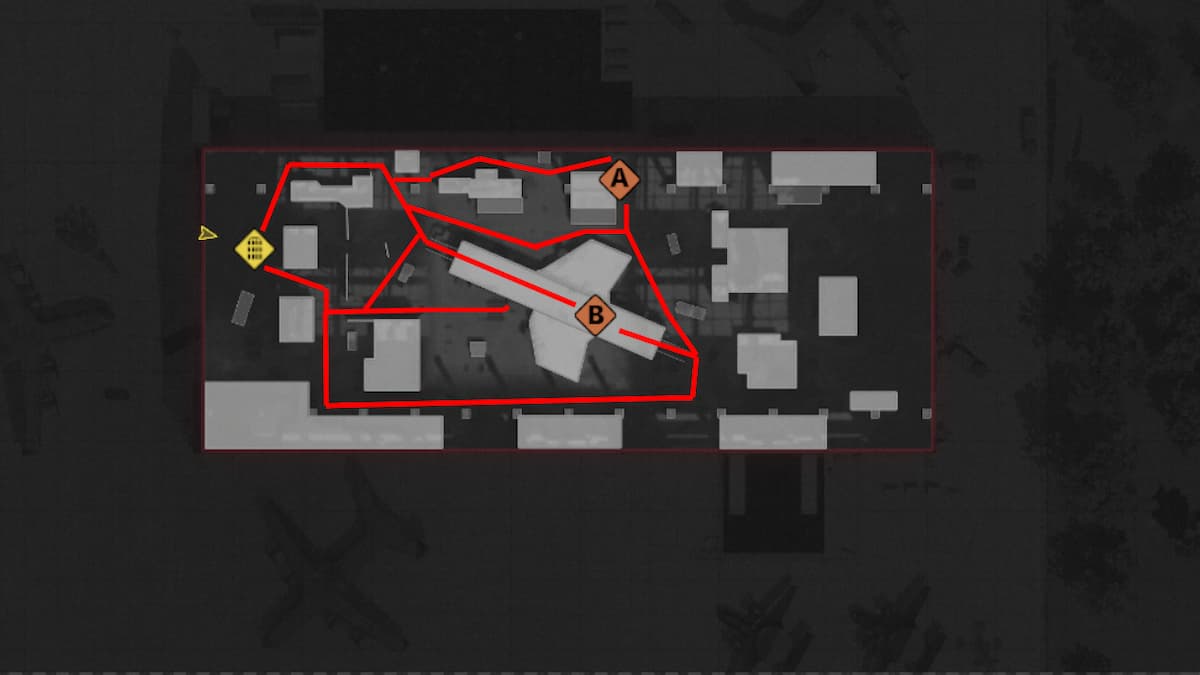
Checkmate rush routes: A
A is the more direct bombsite. That doesn’t mean you have to take a straightforward path. There are plenty of opportunities to rotate and take the bomb site from different angles.
- The first pathway to the objective moves through the north of the map. It is essentially a straight shot to A with only a few obstacles.
- That lane also gives you the opportunity to push through the middle of the map. Instead of staying north, head south just a bit and hug the plane. This is the perfect chance to separate from your partner to safely cover more ground.
- Another linking route goes through the middle of Checkmate on the other side of the plane. Go underneath it for an alternative backend route.
- The final lane to the bombsite isn’t much of a rush route. This is more of a stealthy option via a full rotation around the southernmost part of the map to attack the objective from behind.
Checkmate rush routes: B
Branching lanes help on-the-fly strategies succeed. Fake hits on the more vulnerable A site to lure enemies away from B for easier plants. Switching targets throughout the match is surprisingly effective.
- The northern route that goes to A veers down, around the plane, and up the stairs. Take B from the defender side for a potential backstab.
- Straight through the plane is another option. Enter from the top or middle lane (if you don’t mind taking your time with the latter). This is the quickest way to the bomb site, which can be a risk or reward depending on where your opponents set up. Note habits like if they alternate sites every round before sprinting into this spot.
- The last pathway to A gets cut short to create the last B route. Instead of pushing through the bottom of the map and then up to A, stop and cut to B from the back of the plane.
Top attacking weapons on Checkmate
- AK-74u: Muzzle Brake 5.56, 9.3” Extended Barrel, Foregrip, Tactical Stock, Quickdraw Handle
- MP5: 9.1” Rifled Barrel, Steady Aim Laser, Foregrip. Speed Tape, Collapsed Stock
Submachine guns are an attacker’s best friend in 2v2 Search and Destroy. One player should run the above AK-74u loadout while the other loads in with the MP5 class.
The AK-74u attachments make it deadly up-close and farther away against assault rifle users.
Speed is especially important on offense. Use the MP5 loadout to quickly take sites and aim under fire.
Defensive lines of sight to protect both objectives
There are just as many lines of sight to hold on defense as there are routes to take on offense. As a defender, it is best to hold longer angles. Engage the enemy first for an advantage in every firefight
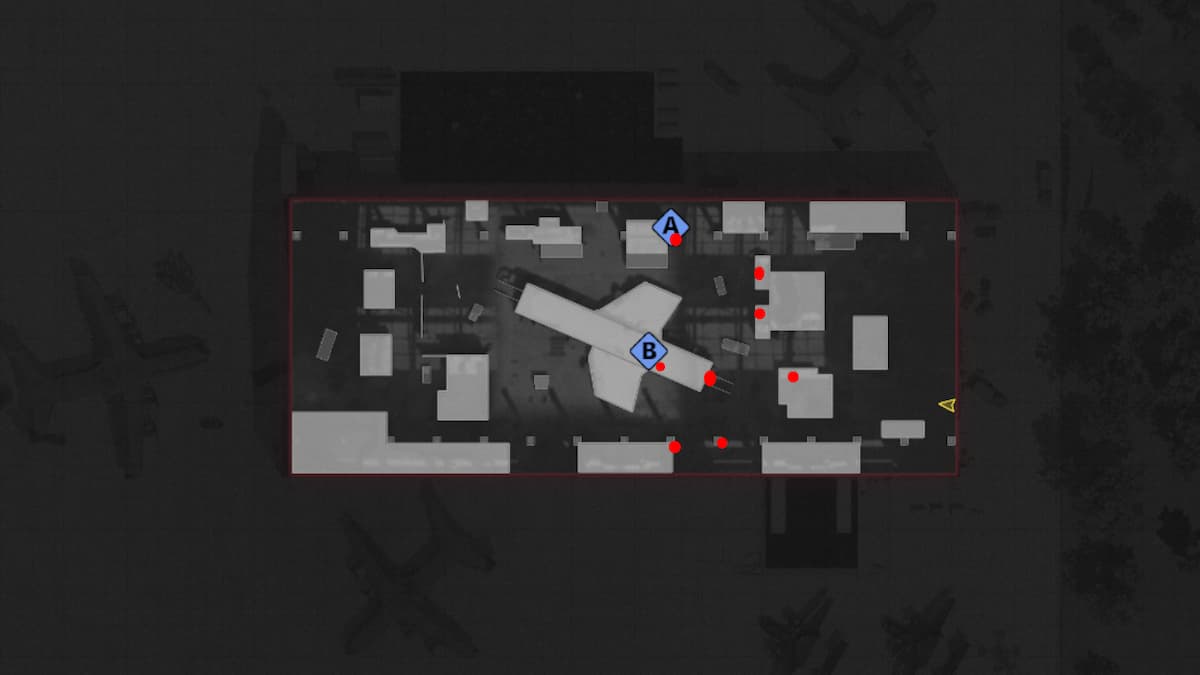
Spots to defend A on Checkmate
- Stand next to A to surprise rushing enemies and keep an eye on the center of the map.
- Pair the position next to the bomb site with the second-highest dot on the map. This spot offers multiple angles and cover. Most importantly, you have another line of sight on A or the center of the map. You can also spot enemies through the plane unless they’re crawling.
- The position further back is a safer angle to hold A. Teams can even regroup safely on the right side of the map before coordinating a defensive push.
B site positions
- The dot next to B requires smooth movement to reach at the start of the round but can lead to fast wins. Wait for a plant, pop out, and surprise your opponent similar to the spot on top of A.
- Fall back to the stairs that lead onto the plane for another safe location. This spot removes any doubt of if the other team is in the plane since you can see down the corridor versus a limited view in the corner.
- Only hold the stairs if your teammate is watching your flank from the tower. Otherwise, it’s almost too easy for enemies to get the jump on you.
- The last two spots are at the bottom of the map. Like the previous positions, one is tailored to aggression, while the other is more defensive. Both only really protect the southern lanes. Players can also rotate through their spawn to A.
Best 2v2 SND defensive loadouts
- AK-74u: Spetsnaz Compensator, 9.3” Extended Barrel, Spetsnaz Speedgrip, GRU Elastic Wrap, KGB Skeletal Stock
- PPSh-41 (Gunfighter Wildcard): Microflex LED, KGB Eliminator, 14.9’ Rifled, KGB Target Designator, Spetsnaz Grip, Fast Mag, Speed Grip, Raider Stock
- AK-47: Microflex LED, 20” Liberator, Spetsnaz Grip, GRU Elastic Wrap, KGB Skeletal Stock
- Krig 6: Millstop Reflex, 19.7” Ranger, Field Agent Grip, Airborne Elastic Wrap, Raider Pad
Getting to positions as soon as possible is crucial for some of these spots to work. A couple of the best SMGs in Black Ops Cold War give you enough mobility to comfortably set up at the start of every round.
The AK-74u is too good to not use. The attachments listed keep its speed intact and provide firepower for any duel.
More aggressive players will want to opt for the PPSh-41. Its ADS speed, reload speed, and recoil control help ensure you land the first and last shot.
Patient players should go for an assault rifle class. The AK-47 is as powerful as COD weapons get with solid damage at any range.
Last up is the Krig 6. This is arguably the best AR in Black Ops Cold War. The loadout boosts accuracy, damage, and range. It can easily hold any angle or objective.
This guide is only the first step to get you and your partner noticed in competitive Call of Duty. Join the Open Series for a chance to be featured live on PlayStation’s Twitch channel.