
Savvy Call of Duty veterans may know Raid inside and out, but there is always time for a quick refresher if you want to topple the competition in the Black Ops Cold War Open Series.
The Cold War version of Raid maintains the Hollywood mansion appeal players fell in love with from Black Ops 2. Expect fast-paced action through long lanes and tightly packed rooms. It is the perfect battlefield for 2v2 Search and Destroy thanks to quick routes, flanking opportunities, and angles to hold the objectives.
Raid rush routes
Raid is most similar to Garrison out of all of the Open Series maps. It features multiple routes to both bomb sites and elevated lines of sight. The small number of enemies makes Raid’s lanes easy to manipulate because the offensive duo can safely navigate large portions of the map.
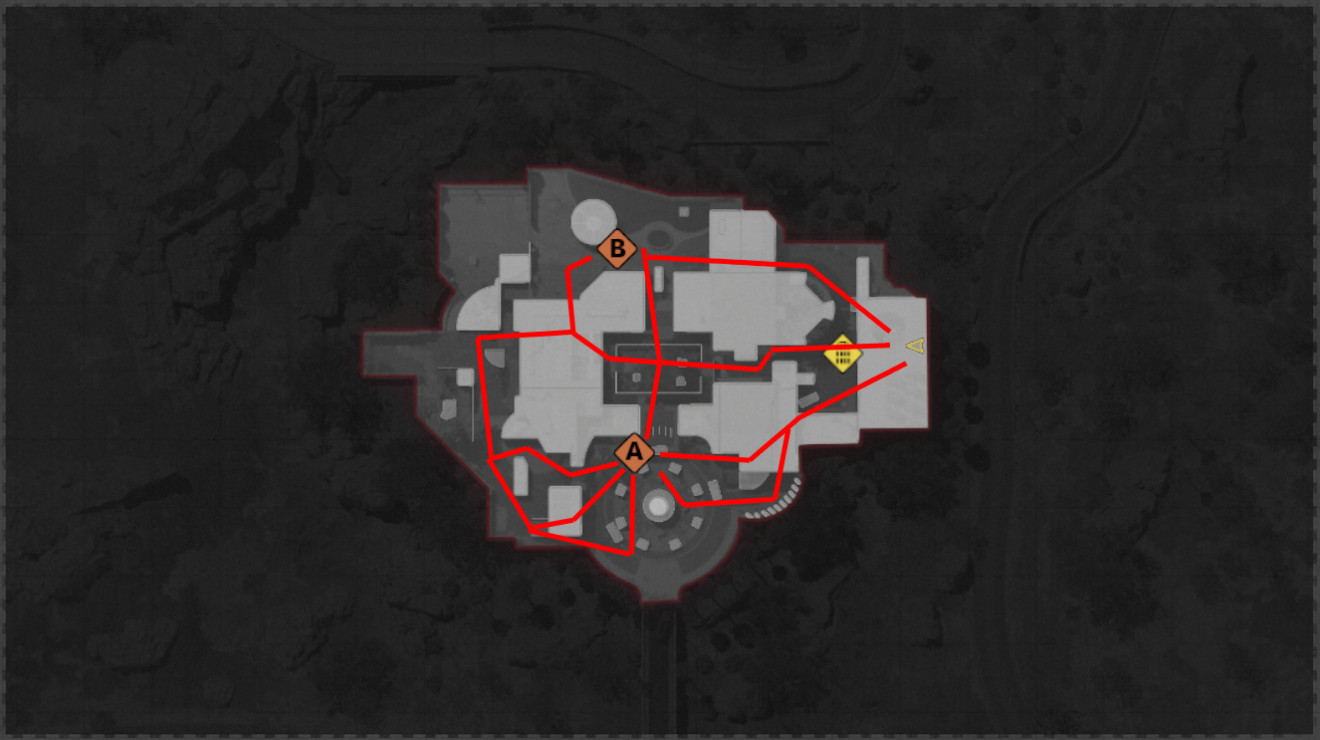
Attacking A
Once you exit the spawn garage, follow the pavement to the left. This will lead you to the A side of the map. You can choose to enter the building and set up a push from the upper floor window or stick to the outside. If you stick outside, use the extra cover en route for a safe arrival.
The remaining ways to take A all branch out from the middle of the map. Sprint forward out of the spawn garage to the center courtyard. This is a good opportunity to grab the other team’s attention with shots or equipment while your teammate pushes another route.
There are options galore from the middle of the map. You can rush straight from mid to A or through the defender side building for a huge flank.
On that flank, there are three areas to rush through toward the objective. One is a direct wrap-around. The other goes into Laundry and through the window. The third and final approach to A leads onto the ledge outside of Laundry.
Pick alternate paths to mix up your attacking routes for different lines of sight on potential defensive holds before taking the objective.
Paths to B
B has fewer rush routes and fewer chances to flank than A. If you want to flank, move through mid similar to the A bombsite variation. The room overlooking B is commonly referred to as Money. It has a window for easy access to the objective’s backside.
Another middle of the map route to B mirrors an A route. Take the courtyard early on to get a feel for the other team’s position. Head north to the pool area and B is to the immediate left.
Lastly, you can attack B directly from the Poolhouse. It is ill-advised that the bomb carrier pushes through the top of the building. Leave your teammate there to cover you from the window and follow the sidewalk to the objective. This is the quickest way to B from spawn.
Best Raid SND offensive weapons
- XM4 (Gunfighter Wildcard): Microflex LED, Airborne Elastic Wrap, 11.8” Extended Barrel, Field Agent Grip, 40 Rnd Mag, Raider Paid, Infantry Compensator
- AK-74u: 9.3” Extended Barrel, Spetsnaz Speedgrip, GRU Elastic Wrap, KGB Skeletal Stock, Muzzle Brake 5.45
The XM4 and AK-74u classes will do more than get the job done for attacking teams in 2v2 Search and Destroy.
The loadout for the XM4 increases its bullet velocity, sprint out speed, aiming move speed, ADS time, vertical and horizontal recoil control, flinch stability, mag size, and ammo capacity. These boosts will help you hold down a planted bomb or get the jump on enemies across the map.
There isn’t a better SMG to attack with than the AK-74u. The attachments improve mobility, recoil, and bullet velocity for long-range gunfights. It will ensure that you reach your angles quicker with the damage to make risks pay off.
Defensive SND positions
Both objectives are much closer to the defender’s spawn than on any other map. You can quickly reach either and set up your strategies with plenty of time to spare.

Lines of sight for A
Four spots near A are ideal for holding the objective.
- Aggressive defenders can push toward the structure and hold the south section of the map with eyes on the attacker's side approach and mid pillars.
- The ledge outside of Laundry serves the same purpose but is a much safer alternative. Players can fall back and regroup if necessary.
- Above that dot is the Laundry callout window. This position offers a clear view of that entire area, barring opponents behind cover.
- The last angle to hold near A is to the north of the Laundry building. Sit in the corner just before the opening. You can spot anyone rotating through the southern part of the map while your teammate in the building focuses elsewhere. This is another great spot to rotate out of if the plant goes down on B.
Mid positions
There are two advantageous positions to hold as a defender in the middle of Raid.
- The first is another aggressive location. Head through the defender side building and enter the courtyard. If you make it here fast enough, you can pick off enemies pushing mid from left, right, or center.
- The second backs up just a bit into the building. Holding the door has its benefits. Escape if you are under fire or utilize a great line of sight on the pillars near A.
B angles on Raid
B also has four effective angles to hold near the site.
- The first is in the circular building just before the objective. Rush into the building and sit tight. You can pop out to surprise opponents when they get into position after planting. This spot even thwarts flanks through the pool.
- Next up is a position on the basketball court or the dot at the top left of the map. This vantage point prevents enemies flanking through Money from getting behind you.
- Another fantastic angle to take is on the ledge with the flower-covered wall outside of the Money window. You can go prone here and wait patiently for the hit on B. There’s direct vision to the site and a lot of safety, especially when coordinating as a team.
- Hold B from Money. This is an elevated position that keeps you covered. Position your teammate in one of the mid spots so you are not unexpectedly pushed.
Best classes for defense
- XM4 (Gunfighter Wildcard): Microflex LED, Airborne Elastic Wrap, 11.8” Extended Barrel, Field Agent Grip, 40 Rnd Mag, Raider Paid, Infantry Compensator
- AK-74u: 9.3” Extended Barrel, Spetsnaz Speedgrip, GRU Elastic Wrap, KGB Skeletal Stock, Muzzle Brake 5.45
- Krig 6 (Gunfighter Wildcard): Microflex LED, 19.7” Ranger Barrel, Field Agent Grip, Airborne Elastic Wrap, Raider Stock, Infantry Compensator, 40 Rnd Mag
The first two loadouts should look familiar. They are the exact same loadouts for the attacking team. This map is all about quickness during Search and Destroy. You need to get to your angle first and hold it with matching firepower. The XM4 and AK-74u will do just that.
The Krig 6 makes a difference on defense. It gets more ammo with the 40 Rnd Mag, an almost unfair recoil control, and speed that rivals other powerful weapons. This assault rifle was made for holding down lanes and ripping rushers apart. It is strongly suggested that you or your teammate run the Krig 6 loadout on defense while the other picks from the first two.
Stick with your teammate, lockdown lanes, and make Raid a nightmare for your enemies in the Black Ops Cold War Open Series.